Undoubtedly, AirPods are magnificent, but far from excellent. A plethora of Windows 10 users across the world have reported issues and errors while connecting the AirPods to their PC. Do you also use AirPods and run into several problems? Nothing to worry about, you are not alone, many users have witnessed the same issue. And, fortunately, you can get rid of this issue pretty easily. The post focuses on the possible solutions that can help you fix no sound on AirPods in Windows 10.
Initial Workarounds to Fix AirPods Connected But No Sound on Windows 10
Before trying any complex or challenging solutions, here are a few handy ways to bypass the problem.
First and foremost, be sure that your correspondence AirPods have sufficient battery and are not physically corrupted or damaged. For this, you test the AirPods with another Windows PC or a mobile phone.Most of the temporary glitches or errors can be resolved just by simply rebooting the system.Consider unpairing or disconnecting the AirPods and then pairing them again. Read here how to connect AirPods to Windows 10In order to avoid interference remove or disconnect the other audio devices from your computer.
A List of Solutions to Fix AirPods Connected But No Sound on Windows 10
If any of the above suggested basic hacks doesn’t work for you, then you have to try the more advanced troubleshooting tips. Though you perhaps don’t need to give all of them a try, just make your way through each and execute the one that helps you fix AirPods connected but no sound on Windows 10. Now, without further ado, let’s get started:
Solution 1: Update your Bluetooth Driver
Most device malfunctions occur because of driver issues. If your Bluetooth drivers are outdated, faulty, or missing, then it is possible to encounter AirPods connectivity issues like AirPods connected but no sound rendering. Hence, it is important to install the correct Bluetooth driver, and also keep it up-to-date. There are mainly two methods to update the Bluetooth driver that’s manually or automatically. If you are tech-savvy and aware of computer hardware, then you can manually install the correct Bluetooth drivers by visiting the official website of Bluetooth Adapters such as Intel, Realtek, or Qualcomm. And, if in case, you don’t have sufficient time and required technical expertise to find and download drivers manually, then you can do it automatically with Bit Driver Updater. Bit Driver Updater is a globally certified driver updater software that has the potential to repair all faulty drivers in just a few clicks of the mouse. Not only for performing driver updates, but the utility is a great way to keep the PC optimized and enhanced. The driver updater automatically identifies the correct version of Windows OS and then installs the most compatible drivers for you. Follow the steps below to update Bluetooth drivers with Bit Driver Updater: Step 1: First of all, download the Bit Driver Updater on your PC.
Step 2: Run its setup file and finish the software installation by performing on-screen instructions. Step 3: Summon Bit Driver Updater and wait until the driver updater scans your machine completely for outdated or broken drivers. Step 4: Now, you will see a list of drivers that need to be updated. To install their newest version, click on the Update Now button displayed alongside the driver. Step 5: Else, click on the Update All button run bulk driver downloads in one click.
It is advisable to use the premium version of Bit Driver Updater in order to unleash its overall potential. Bit Driver Updater offers 24/7 technical support and a complete money-back guarantee within 60-days of purchase. The software boasts an in-built scan scheduler that allows you to schedule the scan time at your convenience. Also Read: Update Wifi Driver on Windows 10 – Update Wireless Software Easily
Solution 2: Install Latest Patches
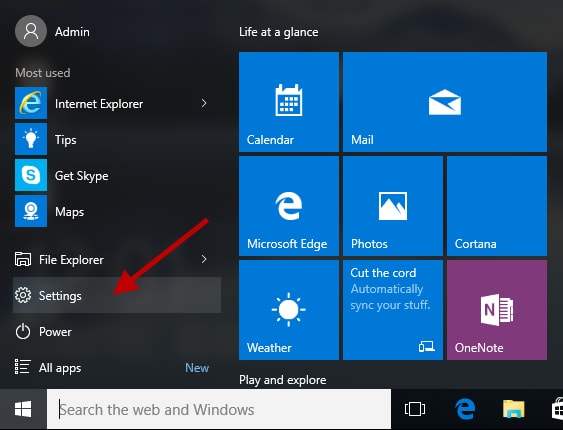
When your connected devices abruptly start to malfunction on the computer system, then there may be something faulty in your Windows operating system. Windows frequently release patches and updates for bug fixes and improvements. So, you should try to install the latest patches to keep your PC and connected devices in good working condition. Below is how to fix AirPods connected but no sound by checking for the latest Windows Updates: Step 1: Go to the Start menu, and click on the gear (Settings) icon.
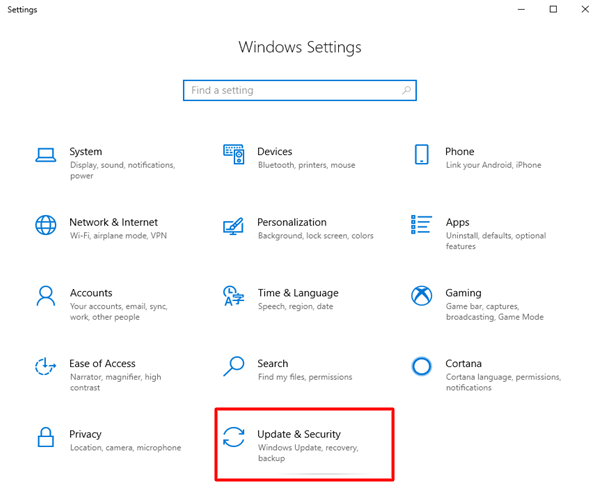
Step 2: Now, Windows Settings will be prompted on your screen. From the window, choose the Update & Security option.
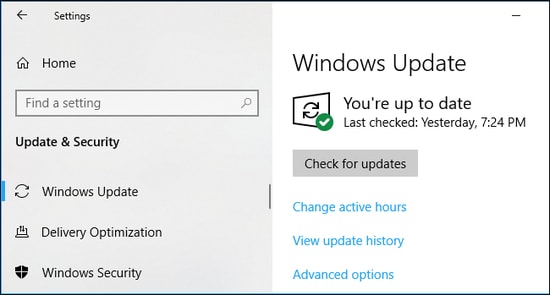
Step 3: Next, select Windows Update from the left pane. Step 4: After that, click on Check For Updates.
If there is any update available, the downloading and installation process will automatically begin. Wait for Windows OS to complete the process. Once the process is finished, reboot your computer and test the issue. If it remains the same, try the next solution. Also Read: How to Use Apple Music on Windows 10 (Step by Step)
Solution 3: Set AirPods as the Default Device
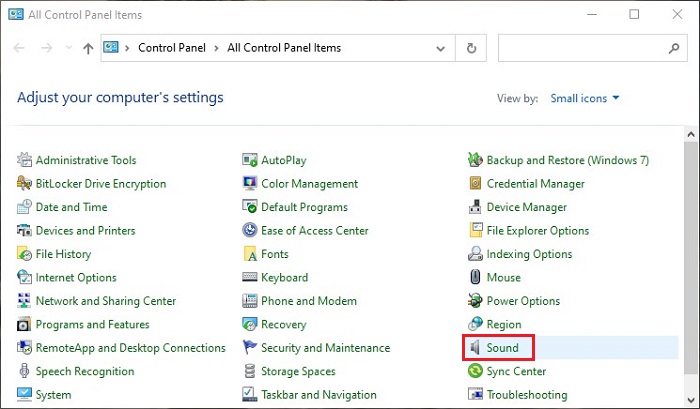
To ensure that your AirPods function accurately at all times on Windows 10, you should set the hardware as the default device. Below is how to do that on Windows 10: Step 1: To begin with, press Windows + R keyboard keys at the same time to invoke the Run Dialog box. Step 2: Then, type Control into the text field of the box and hit the Enter key from your keyboard. Otherwise, you may also click on the Ok option.
Step 3: This will invoke the Control Panel, where you need to set View by as Small icons. Step 4: Next, make a click on the Sound from the options that appeared.
Step 5: In the subsequent window, be sure that your AirPods are enabled under the Playback option. Step 6: Click on the AirPods and then click Set Default. Step 7: Thereafter, locate the Recording option, and set AirPods as the Default Device. Step 8: Lastly, click on OK to save new changes. Now, test if the AirPods no sound issue on Windows 10 has disappeared. Unfortunately, if not, then try another method explained below. Also Read: Fix Connections to Bluetooth Audio Devices and Wireless Displays in Windows 10
Solution 4: Start the Bluetooth Support Service Again
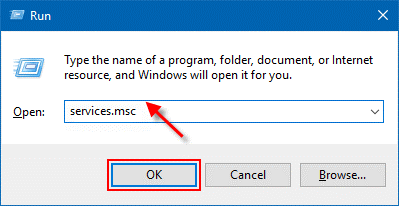
Last but not least, try to restart the Bluetooth support service. Just like other hardware, Bluetooth headphones like AirPods need specific services to function properly on Windows PC. If the service is not started or running, you may run into sound issues. Here is how to fix AirPods connected but no sound on Windows 10 by restarting the required service. Step 1: From your keyboard, altogether hit Windows logo + R keys to trigger the Run Dialog box. Step 2: Next, input services.msc inside the run box and make a click on the Ok option. Or, you can also press the Enter key from your keyboard.
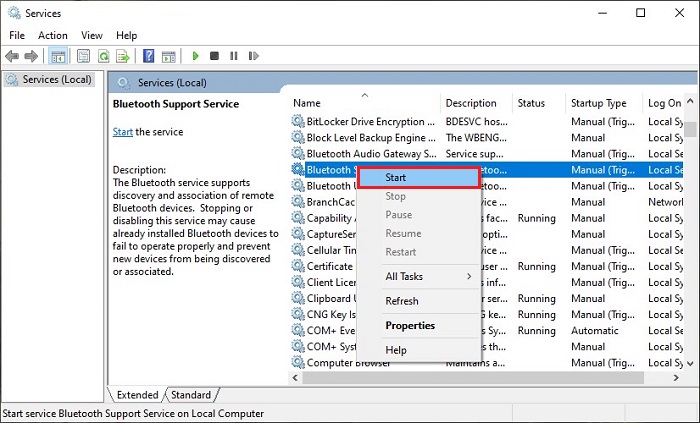
Step 3: This will take you to the Windows services page, where you see the list of services, navigate to the Bluetooth Support Service and make a right-click on it. Step 4: Now, if the service is not running, then click on Start. And, if the service is already in a running state, then click on the Restart option.
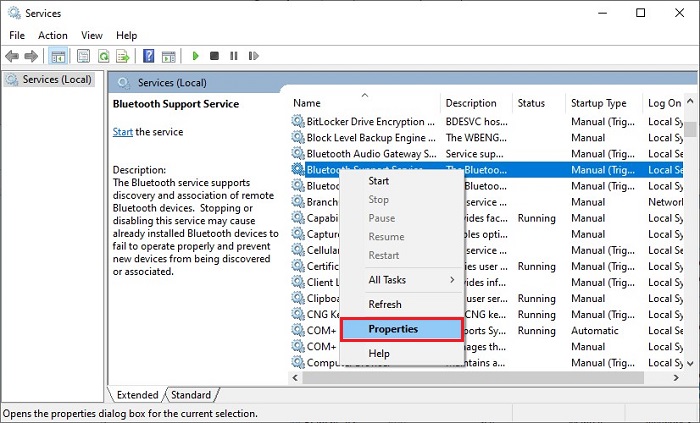
Step 5: After that, click right on the service again and choose Properties from the context menu list.
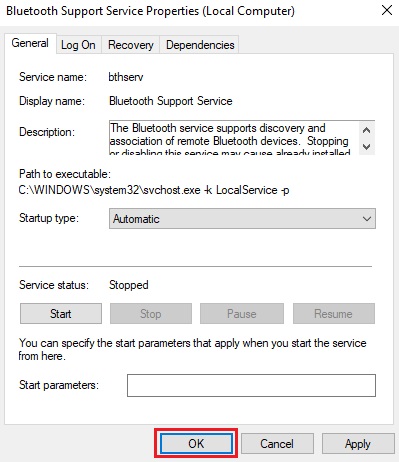
Step 6: In the Bluetooth Support Service Properties window, you will require to set the Start Type to Automatic. Step 7: In the end, click on the Ok option to apply the recent changes.
Once done, check to see if your AirPods start working fine as expected. If not, then as a final resort, you should contact the official Apple Support. Also Read: How to Turn on Bluetooth on Windows 10 [Complete Guide]
Was this Troubleshooting Guide Helpful?
In this write-up, we have explained a few strategies to fix AirPods connected but no sound on Windows 10. Hopefully, now you will get proper sound from your AirPods on Windows 10 PC. If you have any questions or further suggestions, then do tell us in the comments box below. Also, let us know in the comments, “which troubleshooting worked for you?”. Lastly, before you go, do subscribe to our Newsletter for more tips & tricks related to the tech world. Moreover, get in touch with our tech experts on Facebook, Twitter, Pinterest, and Instagram.


