Also, when the graphics driver software is not updated properly, then also many users have encountered this error. Nvidia Control Panel provides users with useful features to control the properties of Nvidia Graphics Card. Sometimes, the users find that the Nvidia display settings are not available, or the Nvidia Control Panel goes missing from the Desktop Context menu, Start menu, or from the Desktop. Preliminary reasons behind this could be faulty graphics card drivers after updating them or missing registry subkeys and values. Some random troubles might also be responsible for the missing Nvidia Control Panel error. So, here we are with a tutorial on how to fix the Nvidia control panel missing on Windows 10 problem.
How To Fix Nvidia Control Panel Missing On Windows 10?
Let us now dig deeper to understand the methods of solving the problem of the Nvidia Control Panel not opening error. The major reason behind ‘Can’t locate NVIDIA Control Panel’ and other PC snags is out-of-date or damaged Windows drivers. The best way to resolve such problems is to use a powerful free driver update utility, i.e., Bit Driver Updater. This program effortlessly takes care of all driver-related problems that are causing trouble to the functioning of your hardware devices. To download and install the latest Nvidia graphics drivers for free, click the button below!
1. Restart Nvidia Services
When you are unable to spot the Nvidia Control panel on your Windows 10 system then restarting the Nvidia services can help you significantly solve the error. Here are the steps to restart the Nvidia services:
Open the Run dialog box by pressing the Windows key + R key together.You then need to open the Services window by typing ‘services.msc’ in the Run dialog box followed by pressing Enter.Try to locate the Nvidia related services.Click right on the Nvidia service and then hit the Restart button appearing on the pop-up menu.If you see that a particular Nvidia service is not running then right click on the service to select the Start option from the context menu.
Once you are done with this, after that open the Nvidia Control Panel and see if the issue is resolved, otherwise try the subsequent methods. Read More: How to Update Nvidia Drivers on Windows 10
2. Unhide The Nvidia Control Panel
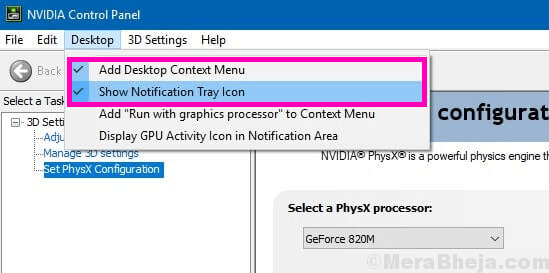
When the Nvidia graphics card software is updated then sometimes the Nvidia Control Panel may not show up on the Desktop Context Menu or Start Menu. Now if restarting the Nvidia services did not help you find the Nvidia Control panel, then you can unhide the Nvidia Control Panel in the following way to see if that helps to fix the Nvidia Control Panel missing error.
Go to the system Control Panel and then double-click to open the Nvidia Control Panel option. (Ensure that you are viewing the items by Large Icons in the system Control Panel.)Find the Desktop or View menu to choose the Add Desktop Context Menu option from the dropdown menu.
Once you have selected the above-mentioned option, then head back to the system’s Desktop and see if you are able to now find the Nvidia Control Panel automatically on your PC Desktop screen.
3. Manually Launch Nvidia Control Panel
Until and unless you are able to find a permanent solution to resolve the Nvidia Control Panel not opening error, till then you can access the Nvidia Control Panel by manually launching it. Here is how you can do so easily:
Navigate to the C Drive folder from My Computer.Find the Program Files folder here.Then, go to the Nvidia Corporation folder and search for the same in the Program Files (x86) folder.When you are finally in the Nvidia Corporation folder, then open the Control Panel Client.Identify the nvcplui file here.
Right-click on the nvcplui file and Run it as an administrator.Create a Desktop Shortcut also by clicking right on the nvcplui file.
Read More: How to Upgrade Your Graphics Drivers in Windows 10
4. Update Graphics Driver With A Driver Updater Tool
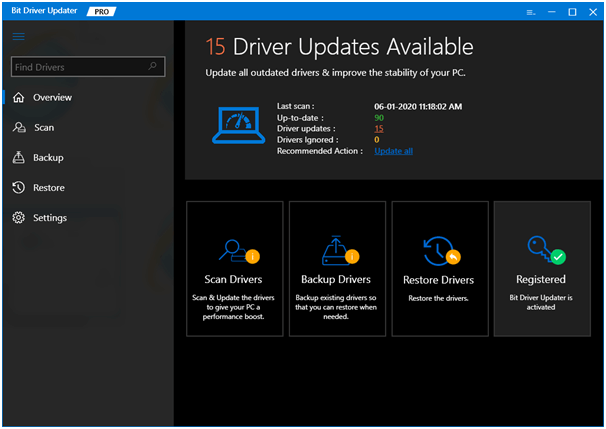
The majority of the issues are due to the faulty drivers in the system. When you encounter the issue of Nvidia Control Panel missing, then it could have risen due to some incomplete or faulty driver update. Under this circumstance, the best approach is to update or download the latest Nvidia graphics card driver with the best driver updater tool. If you’re wondering about which is the best driver updater software for your system, then you may consider installing the Bit Driver Updater program.
Key Features of Bit Driver Updater:
Instantaneously detects broken, out-of-date, and missing drivers.Downloads genuine driver versions that could be installed in a single click.Offers round the clock technical assistance.Boosts system performance rapidly.Offers a database with more than 160000 device drivers.The WHQL testing process by Microsoft has been passed by this tool.
You can install this amazing driver update tool and let it scan your system thoroughly to detect old and faulty drivers. Once the scanning process is complete, you can then install the correct versions of the graphics drivers with a single click and access the Nvidia Control Panel on your desktop. Steps To Update Nvidia Graphics Drivers Using The Bit Driver Updater Tool
After installing the Bit Driver Updater application on your system, let it scan your system automatically.Now, wait for a while. In no time, you’ll get the list of all missing, out-of-date, or mismatched drivers on your system.In the list, go to the Nvidia driver and select the ‘Update Now’ option placed alongside it to download and install its latest, manufacturer-recommended version automatically.
If the driver update method did not solve the problem of missing the Geforce Control Panel, then you can reinstall the graphics driver to fix this issue. First of all, you need to uninstall the graphics driver and clear all files.
You can do this by going to the Device Manager and expanding the Display Adapters section.Here right click on the Nvidia graphics card driver and choose the option of “Uninstall device.”Once the uninstallation process completes, then restart your system.
You can then reinstall the Nvidia graphics driver in the following way. Via Windows Update:
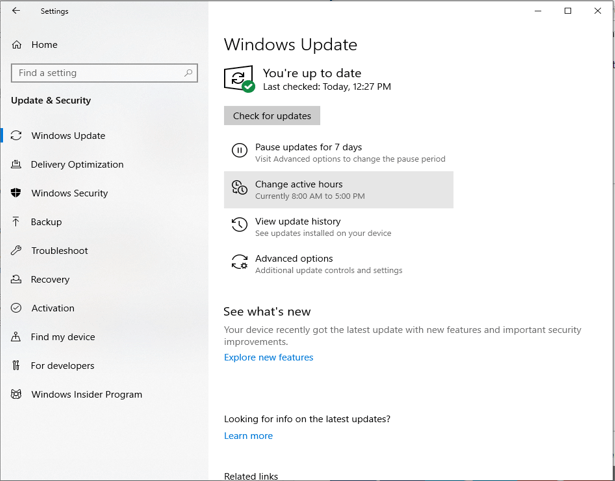
Either go to the Windows Settings and go to Update & Security.Under the Update & Security section, go to the Windows Update.Here, click the “Check for Updates” button to let Windows download the Nvidia graphics driver.
From Manufacturer’s website:
First, check the version of your graphic card driver via device manager.Go to the manufacturer’s website, search for the exact version of the graphics card driver and install it.
Read More: Windows 10 100% Disk Usage in Task Manager [Fixed]
6. Permanent Solution as Per Nvidia Support
According to the Nvidia support, there is a permanent way to get rid of the Nvidia display settings not available error.
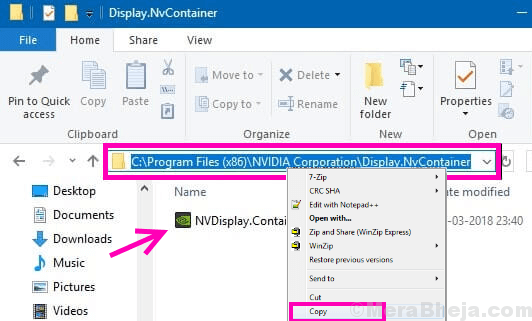
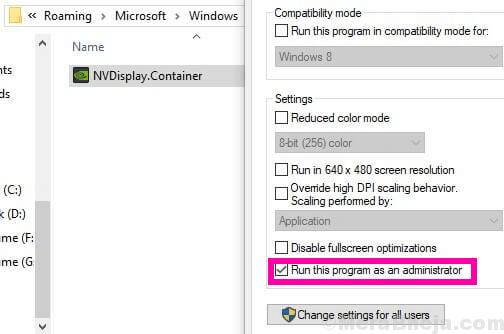
Go to My Computer and then to the Program Files (x86).Find Nvidia Corporation and then go to the Display.NvContainer.
In this location, find the Display.NvContainer file and right click on it to choose the option of Copy.Finally, open the Startup Folder by typing shell:startup in the Run dialog box followed by pressing Enter.Once the Startup folder opens, you can then paste the Display.NvContainer file here.Now right-click on this file and choose the Properties option.Navigate to the Compatibility tab in the Properties window.Check the box which says Run this program as administrator.
Further, click “OK” to implement the new settings.Finally, restart the PC to find the Nvidia Control Panel on your Desktop context menu and Start menu.
Is The Nvidia Control Panel Now Available?
Among the various solutions stated above, the last method as per Nvidia Support and the graphic driver update method are the most potential one’s to troubleshoot the Nvidia Control Panel missing error. Ultimately, if you are still unable to fix the error, then you can get in touch with the Nvidia support team.

