What Are Nested Folders?
Nested folders are folders within a folder that can be created on iOS devices using a glitch in the iOS software. By using nested folders you can squeeze more apps on your Home Screen by containing multiple apps within a single folder. With every update to iOS there have always been glitches that allow users to create nested folders and these glitches are present in iOS 9 as well.
How to Create Nested Folders in iOS 9
In this article there are 2 ways to create nested folders which are both shown below. Unfortunately both methods will revert back to normal once you reboot your device as this is just a glitch.
Method 1
Follow the steps below to create a nested folder in iOS 9. Make sure that both folders are on the same home screen. Just to explain this process in an easy way, we will take the case of 2 folders, a Master Folder and a Subfolder. As it should be clear from the naming, Master Folder is the main folder into which we will be placing the subfolder. In your own case you may have multiple subfolders that you may want to drag in to the master folder.
- Hold Down on Subfolder Hold down on the Subfolder, until it enters editing mode (which is when all the apps on your home screen start to wiggle).
- Continuously Tap on Master Folder Once you have Subfolder held down, continuously tap on the Master Folder while still holding down on the Subfolder.
- Drop Subfolder into the Master Folder As you keep tapping on the Master Folder it will eventually open up, allowing you to drop the Subfolder into it. When the Master Folder opens up drop the Subfolder in to the Master Folder.
- Press on the Home Button Once you are done placing the Subfolder into the Master Folder click on the home button to save the changes you have just made. If you would like to place more Folders into the Master Folder, follow steps 1-4 again. You can watch the video below, in case you did not fully understand the written steps to create nested folders.
Method 2
In case Method 1 did not work for you or you find the method too hard to follow, you can try Method 2 which involves changing the settings. Follow the steps below to create nested folders in iOS 9. For Method 2 we will be using the same folder names: A Master Folder and a Subfolder. Just to refresh your memory, Master Folder is the main folder into which we will be placing the subfolder. In your case you may have multiple subfolders to be dropped into a Master folder.
- Click on Settings On your home screen locate the settings app icon and click on it.
- Click on General then on Accessibility From the settings page click on General and then click on Accessibility from the General settings page.
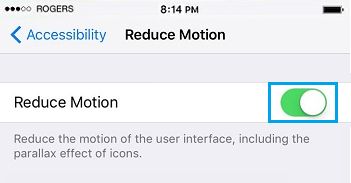
- Locate Reduce Motion and Toggle it on
Now from the Accessibility page locate Reduce Motion option and toggle it on. Toggling on this feature will reduce the parallax effect that is present when moving in and out of folders or apps. 4. Place Master Folder into the Dock Now place Master Folder anywhere onto the dock of your device. 5. Enter Editing Mode and Continuously Tap the area in which the Master Folder is located. Enter editing mode by holding down on the Master Folder. Once in editing mode continuously tap the area in which the Master Folder is located which will let you repetitively move in and out of the folder. 6. In Between Moving in and Out Grab the Subfolder When you are continuously tapping on the Master Folder you will be moving in and out of the folder. In between moving in and out grab the Subfolder and place it into the Master Folder. To place more folders into the Master Folder keep tapping on the Master Folder and in between moving in and out of the folder grab other folders on your home screen and place them into the Master Folder. 7. Click on the Home Button In order to save your changes click on the home Button 8. Settings > General > Accessibility Now once again go into the settings then click on general and then on accessibility. 9. Toggle Off Reduce Motion Watch the video below, in case you did not understand the steps for creating nested folders on your iOS 9 device using method 2.

