Since the pandemic phase began, Webcams have become a crucial part of our lives. From educational seminars to office meetings, Webcams play an important role in connecting us with our loved or dear ones, virtually across the globe. But, recently, we have seen a lot of Mac users encountering issues with their in-built camera. Are you also one of them? Don’t worry, the issue is solvable too. Through this write-up., we are going to explain to you a few approaches in order to fix iMac camera not working issue.
What Causes Mac Camera Not Working?
Before getting into solutions, it would be better to know what stops the camera to work properly on a MacBook. Below we have listed core reasons:
Wi-Fi connectivity problems.Too many apps using your webcam on Mac.Probably, other application settings hinder the streaming process.
Easy & Smart Solutions to Fix Mac Camera Not Working Issue
No matter what is preventing your Mac Webcam from functioning normally, luckily you can fix the issue without any hassles. Below we have explained numerous tested tips & tricks to help you out. However, you are not supposed to try them all, just go your way down and pick the one that suits you best. Now, without further ado, let’s get started.
Solution 1: Verify External Mac Camera Connections
If you are using an external camera, then, you may encounter issues with that external camera connection. However, there are a few hacks you can consider in order to check an external webcam connection on Mac.
Ensure that the port and cable are not damaged, or not covered with dust and are clear.Be sure to plug the cable firmly into the ports.Consider plugging the cable into another port, if your Mac camera is not detected automatically.Do keep in mind to install all the relevant and required software, if you are utilizing a non-Apple camera.
If these basic workarounds don’t help you, then try a bit more complicated and advanced strategies mentioned below. Also Read: How to Take Screenshots on Mac – Capture Your Macbook Screen
Solution 2: Use Terminal to Restart your Mac Camera
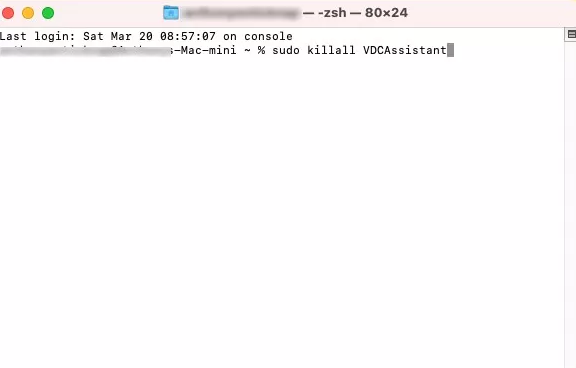
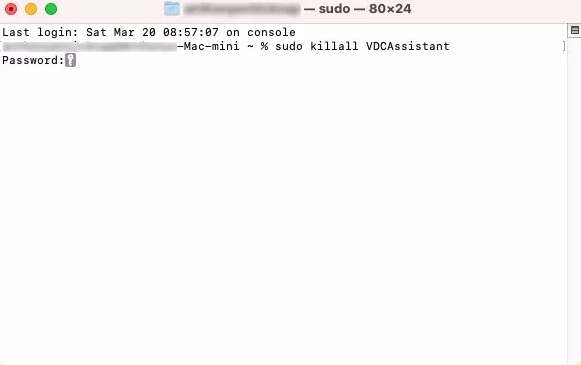
Cameras on Apple devices such as MacBook Airs, MacBook Pros, and iMacs can’t generally be enabled manually. It just automatically turns on when you launch an application that utilizes the webcam including Photo Booth, FaceTime, and so on. But, in some rare cases, it doesn’t happen, in that scenario, you may have to start your Mac camera manually. For this, you can use Terminal. Here is how to fix the camera on MacBook: Step 1: First of all, launch Terminal by going to the Applications, then Utilities, and Terminal in Finder. Step 2: Now, input the following command and hit the Enter key from your keyboard. sudo killall VDCAssistantStep 3: This command will force-close all the applications or programs that access the camera and reset the same. Step 4: A pop-up window will appear, here you will need to input your password. Wait for the process to be accomplished. Thereafter, re-launch FaceTime or desired applications just to see if the Mac camera is working fine. Unfortunately, if not, then move on to other solutions. A Point to Remember: There might be junk or cache on your Mac, which is making your machine vulnerable or slowing down its performance. To get the most out of your Mac, we advise you to keep your Mac clean and clear. In order to clean your Mac hassle-free, you can use any of the best cleaner software like MacKeeper and more.
Solution 3: Reboot your Mac in Safe Mode
Another way to make your Mac webcam work again is rebooting your Mac in Safe Mode. Below is a step-by-step guide to using this method. Step 1: Choose Shut down from the Apple menu and quickly hit the Shift key from your keyboard. Step 2: When the login screen appears, release the Shift key. Step 3: Input your login details when indicated. Now, your Mac is started in the Safe Mode. After that, try to make a switch on your Mac webcam in distinct apps just to check if it works. Unfortunately, it didn’t work for you, then try the next solution mentioned below. Also Read: 15 Best Video Editing Software for Mac in 2021 Solution 4: Ensure you are Connected to the Internet It’s a pretty obvious thing, many problems occur due to the poor or vulnerable internet connection. Likewise, your Mac camera not working because of the bad internet connection issue. Hence, always ensure that you are connected to an active internet connection. If your internet connection is slowing down, then you can try to reconnect to WiFi, restart your router, or use an Ethernet cable.
Solution 5: Update your MacBook
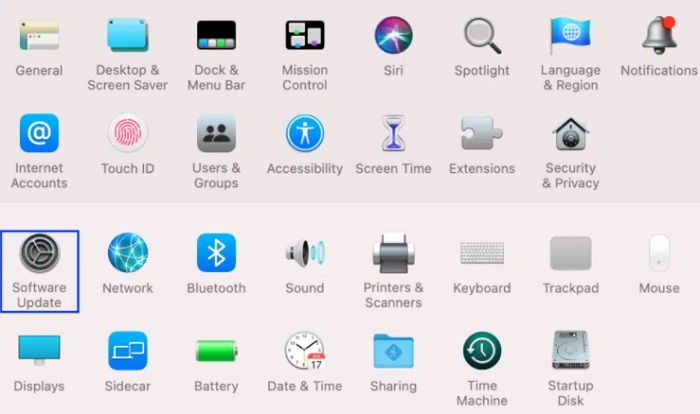
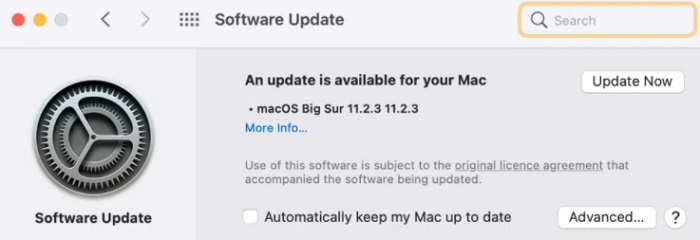
In order to ensure the smooth, consistent, and glitch-free functioning of all the applications & programs incorporating a webcam, you should ensure to keep your macOS up-to-date to the most recent version. Follow the steps below to do so: Step 1: Click the Apple icon to choose System Preferences… Step 2: Then, locate and click on the Software Update as illustrated below. Step 3: Now, check to see if any update is available. If yes, then make a click on the Update Now option and wait for the update to be installed. Once done, check to see if installing the latest updates helps you resolve the issues with your Mac camera. If not, then try another solution to deal with the inconvenience. Also Read: 15 Must-Have Apps and Software for Mac of All Time
Solution 6: Allow Mac Camera Access to Applications
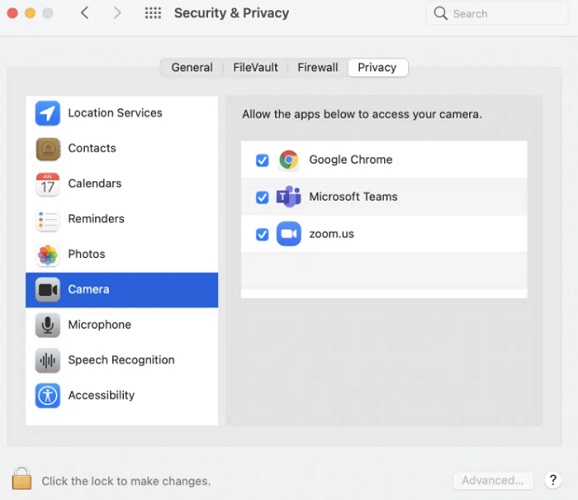
You may encounter an iMac camera not working if your Camera settings are set to Reject, this prevents applications from detecting the webcam, which eventually stops the Mac camera from working properly. Below is how to do that: Step 1: Click on the Apple icon and choose System Preferences… Step 2: Next, click Security and Privacy, then choose Camera as shown below. Step 3: Now, all the apps that have permission to access your Mac’s webcam will appear. After that, make a click on the Click the lock to make changes icon shown bottom left corner. Step 4: Mark the box presented next to the application you wish to permit to access the webcam on your MacBook. After that, launch the application again and check whether the Camera not working on Mac is resolved or persisting. Also Read: How to Stop your Mac from Sleeping (Complete Guide 2021)
Solution 7: Change Screen Time Permissions
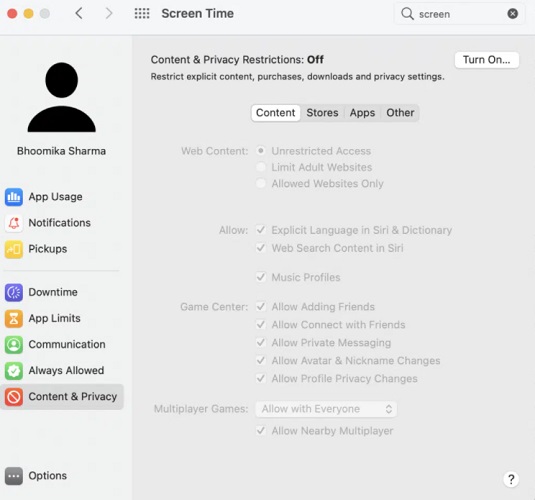
Last but not least, try to alter your screen time permissions. This feature may restrict your webcam functionalities under specific parental controls. To see if that is the case, follow the simple steps shared below: Step 1: Go to System Preferences and choose Screen Time. Step 2: Now, on the left pane, click Content and Privacy as shown below. Step 3: After that, make a switch to the Apps. Step 4: In the next pop-up, you will see a checkbox adjacent to the Camera. Step 5: Mark the checkboxes presented next to the apps for which you wish to access your Mac camera. Thereafter, try to access your webcam in order to check if this solution works. Also Read: 13 Best Uninstaller for Mac to Completely Remove Unwanted Apps
Mac Camera Not Working: FIXED
We hope the aforementioned tactics help you fix Mac camera not working issue. But, if you still run into issues with your Mac camera, then we advise you to contact a highly qualified technician for further assistance. Apart from this, you may also use an external camera. Please let us know in the comments if you have any questions or additional information regarding the same. Also, if you liked the shared knowledge, then do subscribe to our Newsletter for more such informative articles. In addition to this, you can also follow us on our Social Media handles: Facebook, Twitter, Instagram, or Pinterest.

![]()
![]()
