LAN or WiFi is connected but has no internet access? Having no internet connection is probably one of the worst nightmares for every PC user. In the present era, no one can imagine a single minute of their life without an internet connection. When the internet connection becomes vulnerable then it gets quite frustrating to work and the whole work mood gets blown off. Hence, it is very crucial to have an active internet connection to maintain an effective workflow. Additionally, numerous users have also recently complained about internet connection issues. So, don’t panic, if you are one of them. In this tutorial guide, we are going to share some really effective but easy solutions to repair internet connection issues.
100% Working Solutions to Repair Internet Connection in Windows PC
Here, we are going to put together a few solutions that have the potential to fix faulty internet connection issues in Windows 10 or older versions. Check them out below:
Solution 1: Check your Modem or Wireless Router
Before trying other complicated hacks, the basic thing you should do is to test your wireless router and modem, ensuring that the issue is not happening because of your ISP (Internet Service Provider). Reboot the wireless router and modem, then try to reconnect to the network on your computer system. If you use in Ethernet cable to connect to the internet, then try to check if the cable is firmly connected. You can also replace the cable or try to connect the ethernet cable to another port of your router. If in case, your system still fails to connect to the network, then proceed with the other solutions mentioned below. Also See: How to Track Internet Usage in Windows 11 {2022 Guide}
Solution 2: Run Network Troubleshooter
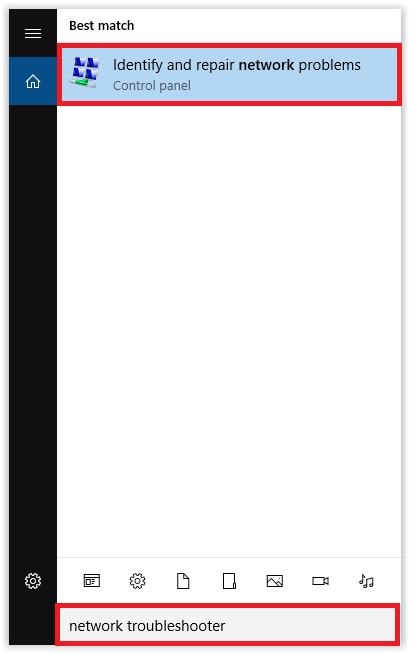
Windows comes with the default network troubleshooter program, that detects the issues on your PC and also provides you with resolutions. In order to run a network troubleshooter, you can follow the steps shared below: Step 1: On Windows PC, type network trouble in the search bar and choose Identify and repair network problems.
Step 2: Wait and let the network diagnostic be completed. Thereafter, go with the on-screen instructions to repair the internet connection in Windows 10. Once it’s done, try to test your internet connection. If it still lags, then move on to another solution.
Solution 3: Forget & Try to Reconnect to the Network
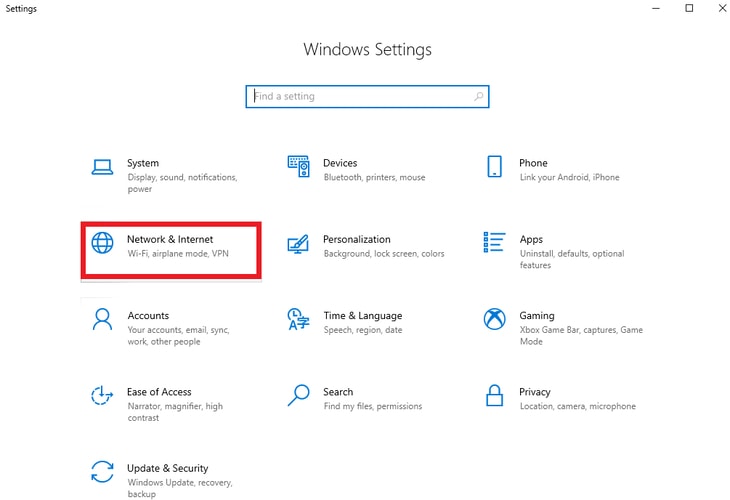
There are numerous network connection errors or problems that could occur on your Windows PC. “Windows 10 can’t connect to this network” is one of them. This error occurs when you try to connect to a wireless network on your PC. If you face this error, then you need to forget the connection and try to reconnect to your network. Here is how to do that: Step 1: Press Windows Logo + I keyboard buttons at a time to Launch Windows Settings and choose Network & Internet from available options.
Step 2: Go to the WiFi section and make a click on Manage WiFi, then Manage Known Networks. Step 3: Choose the Wireless network that you can’t connect to, later click on Forget. Wait for a few seconds and then try to reconnect to the very same wireless network. Once done, reboot your PC and test your internet connection. If it still fails, then try the next solution. Also See: How To Increase Upload Speed On Internet? Tips to Improve It
Solution 4: Update Network Driver
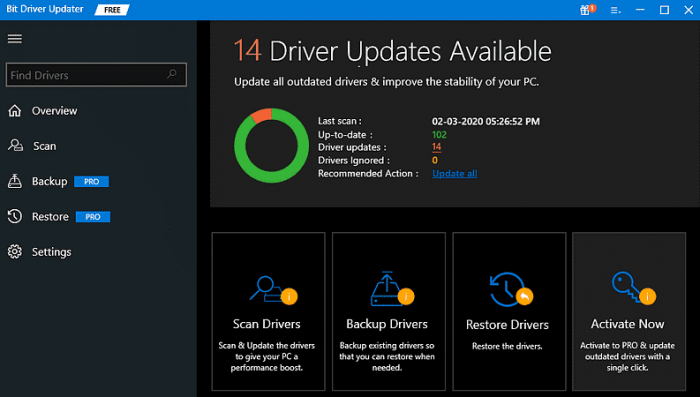
Another way to fix network connection issues in Windows 10 is to update network adapter drivers. When these drivers goes missing or become out-of-date, you may encounter issues with your network connection on Windows PC. To update the network driver you can either visit the official website of the network adapter manufacturer or use any third-party driver updater software like Bit Driver Updater. Bit Driver Updater is a globally recognized software that automatically detects your Windows OS version and later on provides you with a list of required drivers for your device. In order to use Bit Driver Updater, you need to follow the steps shared below: Step 1: To get started, you need to first download the Bit Driver Updater. You can do it either from the official website of Bit Driver Updater or by clicking on the download button below.
Step 2: Run the software installer file by making a double click on it and follow the on-screen instructions to complete the process. Step 3: Once the software is installed, open it and click on the Scan button from the left panel to begin the scanning.
Step 4: The driver updater tool takes a while to finish the process. Once done, locate the erroneous network drivers and click on the Update Now button shown next to drivers. Step 5: Alternatively, the user can also click on the Update All button. This way users can perform bulk driver downloads at once.
Bit Driver Updater is the safest and most reliable tool that only installs WHQL tested or signed drivers. However, in order to unlock its complete potential, you need to upgrade to its pro version. Its pro version comes with 24/7 technical support and a 60-days complete money-back guarantee. Also See: [Fixed] Could Not Connect To Steam Network Error
Internet Connection Issues in Windows 10 PC: FIXED
So, that was all about how to repair internet connection in Windows PC. Hopefully, now you will be enjoying an active internet connection on your Windows PC. If you need further help, then please let us know in the comments section below. For more tech-related articles or information, do subscribe to our Newsletter and follow us on our Social Media: Facebook, Twitter, Instagram, and Pinterest.


